
SMS Everyone for Zapier
Connect SMS to over 2000 apps with our Zapier SMS App!
With our Zapier SMS sender, you can easily connect SMS to thousands of applications.
For example, you could send an SMS to a client every time you generate an invoice in Xero.
You can personalise the SMS with any data that the app provides. eg Client's first name, Account ID, email, invoice number. totals, the URL of attachments etc etc.
Zapier even has steps to convert the data that your app produces into SMS friendly formats.
ZAPIER - KEY FEATURES
-
Send SMS App - Send personalised SMS to one or more recipients
-
Zapier has the ability to make a trigger fire a certain amount of hours/minutes/days before a calendar event starts. So you could trigger an SMS alert 24 hours before a calendar appointment.
-
Receive SMS Replies - There is an SMS Everyone TRIGGER in Zapier that checks our servers periodically for any new replies to your account. See bottom of this page for more info.
Connecting the SMS Everyone App to your app in Zapier
STEP 1 - SIGN UP FOR SMS EVERYONE
Before you can test our Zapier App, you'll need an SMS Everyone account. So please sign up via the FREE TRIAL button below.
Please mention in our sign-up form that you require the account for Zapier integration.
We'll give you a username, password and a Sender ID to enter into the Zapier app.
Plus we'll give you 100 free credits to get you started.
STEP 2 - CREATE THE 'TRIGGER' THAT YOU WANT TO CONNECT SMS TO
Log in to your Zapier account.
In the Zap you created, you will need some trigger event in your App/Software that will tell us to send an SMS to a certain person.
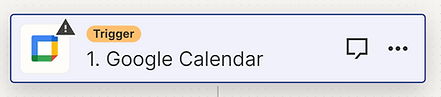
In this example below, let's say it was a new Google Calendar appointment/Event.
You would select Google Calendar as the app and 'New Event' as the Trigger
Next you would need to connect your Google account by entering your Google username and password.
Then in the 'Trigger' section, select the email address you use for that account.
It is important to actually create at least one example of the thing that you want to trigger the SMS so that Zapier has some data to work.
In our example, we would create a new Google Calendar event now so that we have some real data to work with on the next step.
Now, go to 'Test' in the Trigger app and you'll see your test event and all of the data that Zapier is able to gather from that event.
There may be several examples to choose from so select a good one that has plenty of relevant data and then click 'continue'.

STEP 3 - ADD THE SMS EVERYONE APP
Once you've completed the Trigger app (or the app right before where you want to send an SMS), click on either the Action app if its there...

...or the little + sign below the app you're connecting to.
Here, search for 'SMS Everyone' and you'll see 'SMS Everyone Australia (1.0.0)'
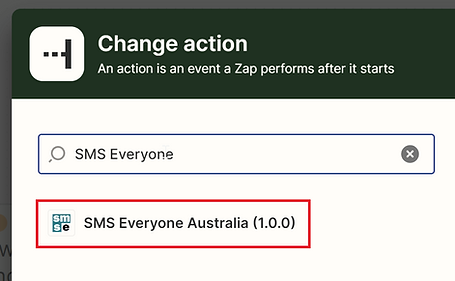
Click it to add SMS Everyone to Zapier.
Next select 'Send SMS' as the event and click 'continue'
Here you'll need to enter your SMS Everyone username and password that we gave you when you set up your account with us in order to connect SMS Everyone to Zapier.

Next on the 'Action' section, this is where you tell the SMS Everyone App which info and/or data from the trigger app (or any app up the chain) will be used to populate our 3 required fields:
Message Text
You can type in the message text that you want to send and also personalise the message text by selecting fields from the available data.
In the example below, we are combining text with 6 of the fields from the Google calendar event.

Sender ID
In this field, enter the Sender ID that we gave you when you signed up.
Our system will only send from Sender ID's that are approved by SMS Everyone.
Non-approved Sender ID's will not work.
Alphanumeric Sender IDs are caps-sensitive.

To Number
This is the mobile number of the recipient/s that you want to receive the SMS whenever your trigger event happens.
You can enter the number manually if the SMS always goes to the same person (like a staff member getting an alert every time an event is added to their Google calendar) or you can enter a field from your trigger app that has the recipient's mobile number in it.
The format of the number must be in international format without the + sign.
For example, 0402123456 would be 61402123456
If your app doesn't provide the number in this format, you can get Zapier to format it for you by clicking the 'Format Data' button to the right of the field.
This will place an app between your trigger app and the SMS Everyone app that formats the data correctly for us.
This example below is the contact phone number field from a Xero invoice.

Clicking 'Format Data' opens a pop up box where you can tell it what format you want the number to be in.
Simply type 'international format without the + sign' in the box and click 'create step'

You'll see that it adds a step above the SMS Everyone app

Be sure to test the output of this step and make sure the To Number looks correct after validation. eg 61400123456
Note: in the Google Calendar example, Google doesn't actually provide an attendee's mobile number so we will put a fixed number in there; imagining that the SMS is always going to a certain staff member.
Multiple values are OK.

Once you have filled in the 3 fields, be sure to test the app in the 'Test' section.
A successful test should send the SMS and you'll see a test response from our system similar to the data below:

If the test is not successful, Zapier will show you the error code passed back to them from our system. If it is not clear how to fix the error from our description, please contact us with the error info and we should be able to help.
If there is not enough live data to send an SMS from the example data that Zapier selected in the trigger section, skip the test, then publish the Zap and make sure it is switched on.

Then go to your software and perform the action that causes the trigger to fire.
If the SMS doesn't send, then check your data to make sure our 3 fields are receiving the correct data. You can retest in Zapier and in the trigger section you can request new data to help show you the values being passed down the zap to SMS Everyone.
Office 365 Example - Send an SMS to a customer 24 hours before their appointment
In Zapier, start by adding the Microsoft Office 365 app as the trigger.
Set the trigger event to be "Calendar Event Start" so that it triggers at a specified time before the event starts.
Connect your Office 365 account to the trigger app. ie enter your Office 365 username and password.

On the "Configure" step in the calendar trigger, set the "time before" to 24 hours:

Now the problem with Office 365 and Google calendar is that they don't offer very many fields for you to store things like the end user's mobile number.
So we are going to use the main description area in Outlook calendar (the large white box) to put some special fields in, separated by a | (pipe) character.
So when you create a new calendar appointment in Outlook, You can make the title whatever you need so that you and your staff understand what it is when you are looking and searching in your calendar.
But in the body of the appointment (the big white box), for any appointment that you want to send an SMS for, put this:
SMS|mobile number|recipient's name|any other field you need| then any extra text that might be required in the calendar.
example:
SMS|61402123456|James|Meeting with James to discuss....
The important fields for the SMS are the first three in red. The "meeting with James..." bit is just for internal use / reference and isn't required for the SMS.
Be sure to put the | character between each field and at the end of the last field you want to include in the SMS. Anything after the final | character will not be used in the SMS. You can type as much info for yourself there as you like.

Its a good idea to create a dummy appointment in your calendar which Zapier should hopefully pick up and you can use it for testing.
So create one say 25 - 48 hours from now.
Be sure to put:
SMS|your mobile number|Your Name|...
in the big body field. eg:
SMS|61400123123|David|
Test the calendar app
Go to the 'test' tab of the calendar app and click 'find new records'
See if you can find the new calendar appointment you just created. If it shows up, select it and click 'continue with selected record'
If it doesnt show up, select any one of the appointments that do show up and you'll see a bunch of data when you click on it.
down the bottom right of the data is an EDIT button. Click EDIT
Now go to the field called "Body Preview" and manually type in at the start:
SMS|your mobile number|Your Name|...
It saves automatically it seems.
Now we have a test record that will work.
Add a filter step
Sometimes you may want to create a calendar event whereby an SMS doesn't get sent. For example your own hair appointment.
if we don't add the filter step to account for these appointments, it will break Zapier and Zapier will switch your 'Zap' off.
This is why the first field in the body of your calendar appointments will be "SMS|..." so we know that this is an appointment that requires someone to get an SMS.
After the calendar trigger app in Zapier, click the + sign to add a next step and search for Filter By Zapier. Select it.
Set the filter rule so that it only continues if the "Body Preview" field from outlook starts with SMS.

Test it and make sure that it continues with the selected test record you have. It should proceed through to the next step.
See above in the green box, it shows that the filter step would continue and highlights that the body preview starts with SMS
Now add a new step after this and search for Formatter by Zapier. This will split up the fields from the body of the appointment.
Select "Split Text" in the transform box. This will turn SMS|0402123456|David into 3 separate useable fields: SMS, 0402123456 and David
Select "body Preview" in the input box. This grabs the data we want to split from the "body Preview" field in outlook.
In Separator put the | (pipe) character
In Segment Index, select "All (as separate fields)"

Continue to the test tab for the formatter and check the output is what you need.
See below how the output from the formatter is now 4 separate fields with output items 2 and 3 being the ones we want:

Now add the "SMS Everyone" app after this.
Action event will be "Send SMS"
On the "Configure" tab, you can now drag in the "output item 2" from the formatter step into the body of the message so that it can say "Hi David..." etc
Type whatever else you need to be in the message.
In the Sender ID step, put the Sender ID that we gave you in the email we sent you when you signed up.
In the "To Number" section, you can drag in "Output item 3" from the formatter step which will put the end user's mobile number as the recipient of the message.
Be sure to test. You should get a personalised SMS sent to your mobile. (or whatever mobile number you put in your calendar.
Adding a date/time to the message
If you want to include the appointment date and time, we recommend adding another formatter step after the one that splits the body content. This will convert the date and time from Outlook to a more friendly looking one for the SMS. Use these settings below to convert Microsoft's date time that they store in UTC time to a nice format in Brisbane time. Adjust the To Timezone to be your timezone of course.

Paths
Another useful tool is "paths"
This allows you to send a different message to the recipient based on certain criteria.
For example, if the meeting is a teams meeting (online), you could add a path that only sends the message if the location of the appointment says "teams"
Then another path would send a message with the physical address if it doesn't detect "Teams"
Below is quite a complex one with 6 paths:
Path 1 - Teams Meeting
If the location in calendar says "teams" it goes down this path and the message text is configured to say "This is a Microsoft Teams meeting"
Path 2 - Sends a specific location
If the location mentions, "board Room" or "Conference Room" then we know this is for a certain office location. So the SMS says "This will be at our XYZ branch"
Path 3 - Phone meeting
if the location says "phone meeting" it goes down this path and the sms mentions that it is a phone meeting
Path 4 - another office based on keywords
Path 5 - another office based on keywords
Path 6 - all other locations.
For the last path you want to have a "fallback" which allows all other options in the location field. (or even no location)
For this, select the "fallback" option.
You should always have a "fallback" path otherwise if there is a criteria that you didnt think of on the other steps then no SMS will be sent.
Be sure to test appointments with all of the scenarios that you've set up in your paths as well as other scenarios that will go down the "fallback" path.
You can test in Zapier by clicking "Test Run" up top right. It will let you know if a step fails.
Once it is all working as it should, publish your Zap and you are good to go.

Xero Example - Send an SMS to a customer whenever an invoice is created
In this Zap below, the SMS Everyone app sends a personalised SMS to a recipient with the URL of their latest invoice in it so that they can pay it directly from their phone.
Scroll to the very bottom of this page and you'll see a link you can click on to use this template.
Before you proceed
This is a complicated Zap. It involves number validation, an API call and extracting data using regular expressions. Zapier handles it mostly for you. However we recommend only proceeding with this one if you are technically savvy.
PRO TIP: In Xero contacts, make sure that your mobile numbers are stored only in the number filed of the phone number area. Preferably as a Mobile Number. Don't put any part of the mobile number in the country or area boxes. like this:

Step 1.
The trigger fires when the invoice is created
Step 2.
Zapier formats the customer's phone number in to international format without the + sign
Step 3.
Using the Xero app here as an 'action' instead of a 'trigger' it performs an API request to Xero to retrieve the URL of the invoice so that the client can put a link in the body of the SMS.
-
Account - log in with the same account info as what you used in the trigger.
-
HTTP Method is: GET
-
The API URL to retrieve the invoice URL is:
-
https://api.xero.com/api.xro/2.0/Invoices/ [INVOICE ID FROM XERO] /onlineinvoice
Step 4.
Zapier extracts the URL from the XML returned by the Xero API
-
The input is "Response Body"
-
Pattern = (?<=<OnlineInvoiceUrl>)(.*?)(?=<\/OnlineInvoiceUrl>)
-
All other fields, select "no"
Step 5.
This is a filter step called "Filter By Zapier." It prevents Zapier hitting SMS Everyone if the mobile number is missing from a contact in Xero which thus prevents errors and Zapier disconnecting the app.
The rule is
-
Only continue if 2. Output (the output from step 2)
-
(Text) Starts with
-
614
Step 6.
The SMS Everyone app sends the SMS. The following text and data goes in to our 3 fields:
Message Text
Hi [XERO CONTACT NAME], your invoice from XYZ Co is below. Please click on the link to pay.
[OUTPUT FROM STEP 4]
Please call 99998888 if you have any queries. etc
Sender ID
The sender ID we gave the client when they signed up.
To Number
[OUTPUT FROM STEP 2]

Error Handling
If your trigger app ever produces data that is missing a field that we require, this will throw regular errors which will result in Zapier turning off the app.
For example in Xero if you don't include the recipient's mobile number for every invoice, we will throw an error because we don't have a valid recipient for the SMS.
If this is the case, add the Filter By Zapier app just before the SMS Everyone App.
This tells Zapier to only proceed to sending an SMS if a certain criteria is met.
In the Xero case where there is sometimes no Australian mobile number, the criteria would be:

So if the Output from the step that generates the recipient's mobile number starts with 614, then that must be an Australian mobile number and Zapier can proceed to sending an SMS.
Retrieve SMS Replies (Trigger)
You can use our SMS Everyone "Retrieve SMS Replies" app to periodically check our servers for any new replies since it last checked.
Depending on the plan you have with Zapier, you can get it to check every 1 - 15 minutes.
Setting Up
Start with a new Zap.
In the trigger app, search for SMS Everyone


Select "SMS Everyone" in the results.
In "trigger event" select "Retrieve SMS Replies"
Connect your SMS Everyone account
Click "continue"
IMPORTANT - before you test this trigger, you need to make sure that you have some SMS reply data on your SMS Everyone account. So please send an SMS from your SMS Everyone account to your test phone. Then reply to the SMS on your phone a couple of times. This will put some data on our servers for Zapier to pick up.
Also note that every time Zapier polls us for data, those SMS replies are marked as retrieved on our servers and you cant retrieve that data again. So if you do a test and need to test again, be sure to send a few more replies from your phone to your account so that there is some data to be picked up.
Now that you have some data to retrieve, click the "Test Trigger" button
You should see some test data available that you can send to your action app/s.
For example, this below is a message received to our system:
-
It was received on 16th Feb 2026 - Note that although the ISO 8601 time zone format shows this as UTC, it is actually Melbourne time in this example.
-
We can set your account to your local time zone but it will still show with the date format with "000Z" at the end (UTC Time) due to a limitation on our side. We can set your account to UTC time if this field is required and you need the ISO 8601 format to match.
-
-
The message came from the mobile number 61411222333 (originator)
-
It was sent to a virtual number 61411222999 (Recipient)
-
The message text was "Reply 4"

If there are multiple SMS replies retrieved.
If there is more than 1 reply when Zapier checks our servers, each reply will be passed to your app/s separately. You don't need to do anything.
From here, simply connect any app to this trigger to pass the SMS reply data to it.
Scroll right to the bottom of this page for some templates you can use.
If you'd like to give our Zapier app a go, click Free Trial below and we'll get you set up in a few minutes for testing.